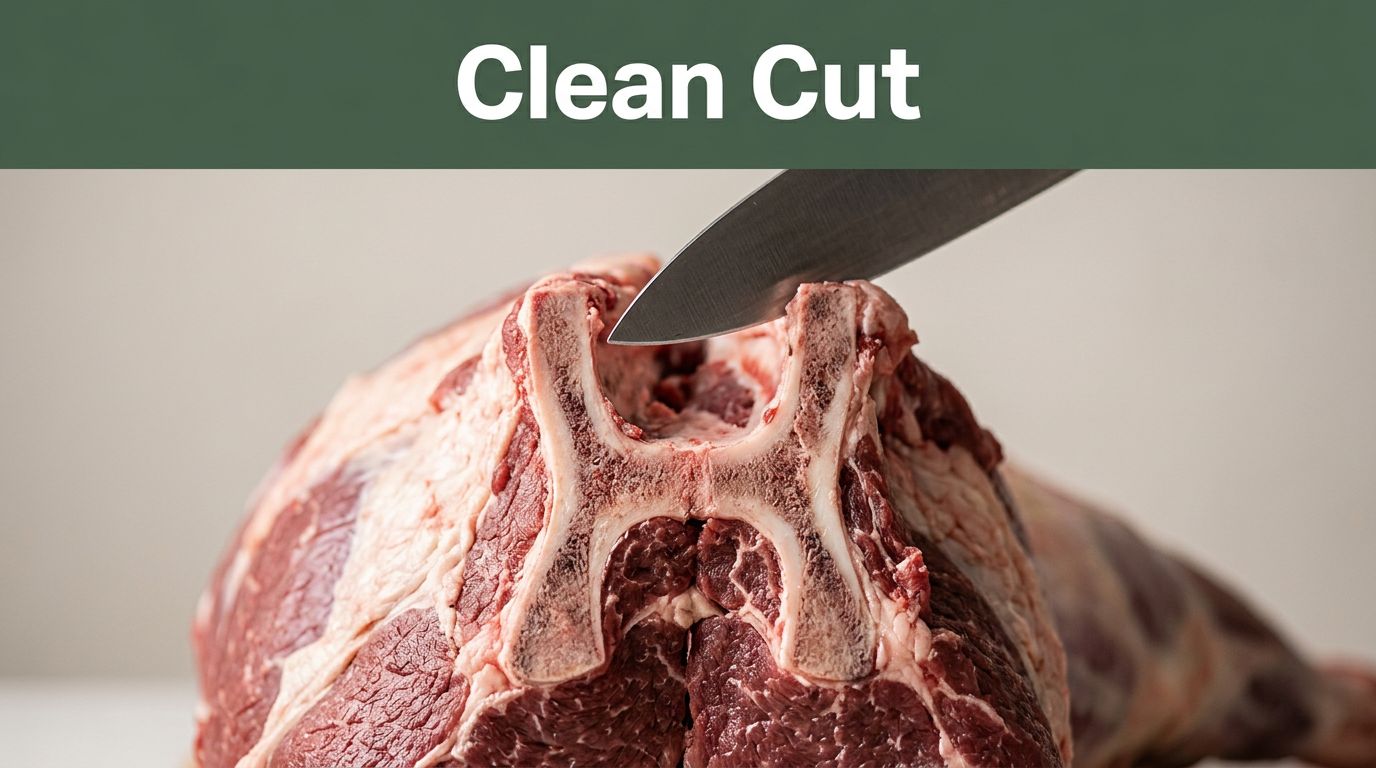
Picture this. A home butcher grabs a fresh hindquarter, knife in hand, ready to separate the round from the sirloin. He misses the subtle curve of the H-bone. Meat tears. Bone chips fly. Waste piles up. Now imagine the same cut, but he spots that H-shaped ridge first. The joint pops free with a clean snap. No saw marks. Perfect primal cuts.
You face that same challenge. The H-bone and aitch bone form the beef pelvis’s core. They look like a flat H, often called the same thing. This structure lets you separate the hip joint without hacking bone. Home cooks and pros save meat. They get better texture and yield. Less trim waste means more steaks for the grill.
This guide walks you through it. You’ll learn anatomy spots, tools, steps, and tricks. Practice once, and you’ll nail every hindquarter. Let’s start with the basics.
Grasp Beef Anatomy Basics: Where the H-Bone and Aitch Bone Hide
Beef hindquarters break into primals like round, sirloin, and flank. The pelvis links them all. It sits at the rear, where leg meets tail and loin.
Focus here. The aitch bone, or ischium, forms a flat plate. It protrudes backward from the round’s edge. People call it the H-bone because its shape matches the letter H laid flat. The pubic and ischium bones fuse into that flange. It connects to the sacrum up top and femur below.
Think of it like a puzzle. The tailbone runs down the middle. Legs attach at sockets on each side. Loin curves forward from the top. Spot this layout, and you avoid slicing into good meat. Rushing blinds you to these landmarks. Damage follows.
The name comes from old English. “Aitch” sounds like H. Butchers named it for the obvious shape. Next time you handle beef, sketch it out. Paper and pencil clarify positions fast.
Key Visual Landmarks on the Carcass
Look for these signs first. A gentle curve hugs the tailhead. That’s the pelvis edge.
A flat plate sticks out back. It widens into an H below the loin. The socket for the femur ball sits inside, like a cup.
Compare it to a flat H on its side. The crossbar runs toward the tail. Legs flank the sides. Do not mix it with the round’s round bone. That’s cylindrical, deeper in the leg. The sacrum stays up front, fused to spine.
These cues jump out on a chilled carcass. Light helps. So does a steady hand.
Feel the Bones Through the Meat
Touch beats sight sometimes. Prep the carcass clean first. Wipe off blood and loose fat.
Probe with fingers. Slide along the tailbone downward. Feel a firm ridge under thin membrane. That’s the H-flange.
Press deeper. A hollow socket yields slightly. Bone feels dense around it. Meat gives way elsewhere.
Practice on trim scraps. Build that sense. It guides your knife later.
Gear Up Right: Tools and Prep for Spot-On Bone Finding
Right tools make location easy. Start with a sharp boning knife. It flexes for curves.
Grab a meat hook. It pulls back fat layers. A flashlight reveals shadows in thick cuts. Use a sturdy cutting board. Gloves grip slick surfaces.
Safety matters most. Sanitize everything. Work on a stable table. Keep knives razor-sharp. Dull ones slip and cut you.
Prep the meat next. Chill it to 34 degrees Fahrenheit. Firm flesh exposes bones better. Trim excess fat and silver skin. This opens the pelvis area.
Your knife traces seams. The hook exposes joints. Flashlight spots hidden flanges. Beginners, hold the knife like a pencil. Light pressure first.
Practice on cheap rounds. Muscle memory grows fast. You will find bones quicker each time.
Step-by-Step: Hunt Down the H-Bone and Aitch Bone Like a Pro
Take a hindquarter, hind side up. Legs point away. Tail toward you.
Follow these steps. Patience wins. Light cuts reveal more.
- Trim fat from tailhead to round edge. Expose the pelvis rim.
- Follow the tailbone down. It dips into the H-flange.
- Feel the flat plate. Knife tip marks its outline.
- Confirm the H shape. Crossbar angles back.
Trouble if hidden? Chill longer. Scrape gently. Bone shows through.
Touch confirms. Firm ridge means you hit it. Now zero in closer.
Expose and Trace the H-Bone First
Start at pelvis edge. Trim straight down two inches.
Follow tailbone. It meets the flange at a V.
Fingers trace the H. Top bar hugs loin. Bottom spreads wide.
Knife tip scores the outline. Light line guides you. Shape matches every time.
Rotate the quarter. Side view clarifies the flat plate.
Zero In on the Aitch Bone Socket
From H-bone center, slide fingers out.
Find the cup-like depression. That’s the femur socket.
Wiggle the leg. Feel slight play. Joint moves free.
Expose it slow. Hook pulls meat aside. No bone cuts yet.
Socket gleams white. Perfect landmark for separation.
Double-Check Your Finds Before Cutting
Match the shape. Does it look like flat H?
Test joint. Leg twists outward easy.
Compare mentally to charts. Pubic bone fuses smooth.
If off, re-trim. Better safe than chipped primals.
These checks save meat every time.
Pop the Joint Clean: Separation Techniques Using Your Bone Landmarks
You found the bones. Now separate.
Hook into the socket. Twist leg outward firm.
Feel the pop. Ball leaves socket with a click.
Knife trims meat only. Follow the seam.
Full hindquarter drops clean. Round pulls free whole.
Tough meat? Thaw partial. Warm water helps.
Frozen? Saw last resort, after landmarks.
Safety first. Grip tight. Watch knife path.
Yields stay high. No waste.
Smooth Cutting Motions for Zero Bone Contact
Angle knife parallel to joint. Short pull strokes.
Follow natural seams. Meat peels back easy.
Stay shallow. Bone stays whole.
Pull leg steady. Joint guides the cut.
Practice yields pro results fast.
Steer Clear of Pitfalls: Ensure Every Cut Succeeds
Rushing hits wrong bone. Slow down. Expose first.
Dull knife slips. Hone before each session.
Warm meat mushes. Always chill below 40 degrees.
Fixes work. Re-chill mushy spots. Sharpen on steel.
Practice three quarters minimum. Note what works.
Saw only for frozen hips. Landmarks still guide.
Build confidence. Film your cuts. Review plays.
You avoid errors. Clean separations follow.
Mastering the H-bone and aitch bone changes your butchery. You spot them quick now. Joints pop clean. Waste drops low.
Grab a hindquarter soon. Apply these steps. Save meat and impress your table.
Share your first clean pop in comments. What tripped you up? Let’s swap tips.
Your skills level up here. Keep cutting sharp.